" width="24px"/><g d="M 0 0 L 24 0 L 24 19.967 L 0 19.967 Z M 0 0 L 24 0 L 24 19.967 L 0 19.967 Z M 6.315 0 L 0.4 0 L 0.4 13.069 L 6.315 13.069 Z M 10.619 12.964 L 4.703 12.964 L 4.703 19.967 L 10.619 19.967 Z M 19.223 12.964 L 13.308 12.964 L 13.308 19.967 L 19.223 19.967 Z M 14.92 0 L 9.004 0 L 9.004 13.069 L 14.919 13.069 L 14.919 0 Z M 23.526 0 L 17.611 0 L 17.611 13.069 L 23.526 13.069 Z" fill="transparent" height="19.966638866961148px" id="NCkgWlRvx" width="24px"><path d="M 0 0 L 24 0 L 24 19.967 L 0 19.967 Z" fill="transparent" height="19.966638865721507px" id="WhvXCmSQc" transform="translate(0 0)" width="24px"/><g d="M 0 0 L 24 0 L 24 19.967 L 0 19.967 Z M 6.315 0 L 0.4 0 L 0.4 13.069 L 6.315 13.069 Z M 10.619 12.964 L 4.703 12.964 L 4.703 19.967 L 10.619 19.967 Z M 19.223 12.964 L 13.308 12.964 L 13.308 19.967 L 19.223 19.967 Z M 14.92 0 L 9.004 0 L 9.004 13.069 L 14.919 13.069 L 14.919 0 Z M 23.526 0 L 17.611 0 L 17.611 13.069 L 23.526 13.069 Z" fill="transparent" height="19.966638866961148px" id="nuNUwQV33" width="24px"><path d="M 0 0 L 24 0 L 24 19.967 L 0 19.967 Z" fill="transparent" height="19.966638865721507px" id="Bf0HKQO0X" transform="translate(0 0)" width="24px"/><g d="M 5.915 0 L 0 0 L 0 13.069 L 5.915 13.069 Z M 10.219 12.964 L 4.303 12.964 L 4.303 19.967 L 10.219 19.967 Z M 18.823 12.964 L 12.908 12.964 L 12.908 19.967 L 18.823 19.967 Z M 14.52 0 L 8.604 0 L 8.604 13.069 L 14.519 13.069 L 14.519 0 Z M 23.126 0 L 17.211 0 L 17.211 13.069 L 23.126 13.069 Z" fill="transparent" height="19.966638552944914px" id="jVq35CQi8" transform="translate(0.4 0)" width="23.126000442504903px"><path d="M 5.915 0 L 0 0 L 0 13.069 L 5.915 13.069 Z" fill="rgb(255, 255, 255)" height="13.069163469557907px" id="wtDrC1hcb" transform="translate(0 0)" width="5.9150000000000205px"/><path d="M 5.916 0 L 0 0 L 0 7.002 L 5.916 7.002 Z M 14.52 0 L 8.605 0 L 8.605 7.002 L 14.52 7.002 Z" fill="rgb(255, 255, 255)" height="7.00230025033261px" id="CD0HwY7Au" transform="translate(4.303 12.964)" width="14.519999542236349px"/><path d="M 5.916 0 L 0 0 L 0 13.069 L 5.915 13.069 L 5.915 0 Z M 14.522 0 L 8.607 0 L 8.607 13.069 L 14.522 13.069 Z" fill="rgb(255, 255, 255)" height="13.069163470797548px" id="j89xtxcnA" transform="translate(8.604 0)" width="14.522000350952169px"/></g></g></g></g></svg>)
" width="18.364000001728535px"/></svg>)

What is Weavy? (Figma Weave)
Weavy is an online platform that lets you connect multiple AI models and pro‑level editing tools into one simple, visual workflow. Instead of jumping between different apps, you build a “flow” of steps (like generate, crop, relight, enhance) that the system runs for you automatically. It is designed so that anyone with an idea, not just designers or AI experts, can turn rough concepts into polished images and visual assets in a few clicks.
Weavy Workflow
AI Mockup Machine
From flat design to realistic mockups
This workflow explores how AI can replace traditional mockup workflows.
By combining structured prompts, masking, and generative models inside Weavy (Figma weave), I created a system that takes a flat design and places it naturally into a real-world environment with correct lighting, perspective, and material behavior in the speed of AI.
Deliverables:
AI workflow
Prompt engineering
Scalable system
" height="1197px" id="lR3GBnWxh" width="55px"/><path d="M 0 0 L 55 0 L 55 1197 L 0 1197 Z" fill="rgb(0, 0, 0)" height="1197px" id="mODOyBwPx" stroke-dasharray="" stroke-linecap="round" stroke-linejoin="round" stroke-width="1" stroke="rgb(48, 46, 51)" width="55px"/><g d="M 0 0 L 24 0 L 24 19.967 L 0 19.967 Z M 0 0 L 24 0 L 24 19.967 L 0 19.967 Z M 0 0 L 24 0 L 24 19.967 L 0 19.967 Z M 6.315 0 L 0.4 0 L 0.4 13.069 L 6.315 13.069 Z M 10.619 12.964 L 4.703 12.964 L 4.703 19.967 L 10.619 19.967 Z M 19.223 12.964 L 13.308 12.964 L 13.308 19.967 L 19.223 19.967 Z M 14.92 0 L 9.004 0 L 9.004 13.069 L 14.919 13.069 L 14.919 0 Z M 23.526 0 L 17.611 0 L 17.611 13.069 L 23.526 13.069 Z" fill="transparent" height="19.966638866961148px" id="koqKw5LcQ" transform="translate(15.5 36.459)" width="24px"><path d="M 0 0 L 24 0 L 24 19.967 L 0 19.967 Z" fill="transparent" height="19.966638865721507px" id="i4OTM2PCT" transform="translate(0 0)" width="24px"/><g d="M 0 0 L 24 0 L 24 19.967 L 0 19.967 Z M 0 0 L 24 0 L 24 19.967 L 0 19.967 Z M 6.315 0 L 0.4 0 L 0.4 13.069 L 6.315 13.069 Z M 10.619 12.964 L 4.703 12.964 L 4.703 19.967 L 10.619 19.967 Z M 19.223 12.964 L 13.308 12.964 L 13.308 19.967 L 19.223 19.967 Z M 14.92 0 L 9.004 0 L 9.004 13.069 L 14.919 13.069 L 14.919 0 Z M 23.526 0 L 17.611 0 L 17.611 13.069 L 23.526 13.069 Z" fill="transparent" height="19.966638866961148px" id="wt7tfQ4n0" width="24px"><path d="M 0 0 L 24 0 L 24 19.967 L 0 19.967 Z" fill="transparent" height="19.966638865721507px" id="Mu9Z9vCDs" transform="translate(0 0)" width="24px"/><g d="M 0 0 L 24 0 L 24 19.967 L 0 19.967 Z M 6.315 0 L 0.4 0 L 0.4 13.069 L 6.315 13.069 Z M 10.619 12.964 L 4.703 12.964 L 4.703 19.967 L 10.619 19.967 Z M 19.223 12.964 L 13.308 12.964 L 13.308 19.967 L 19.223 19.967 Z M 14.92 0 L 9.004 0 L 9.004 13.069 L 14.919 13.069 L 14.919 0 Z M 23.526 0 L 17.611 0 L 17.611 13.069 L 23.526 13.069 Z" fill="transparent" height="19.966638866961148px" id="aZ77HhBiu" width="24px"><path d="M 0 0 L 24 0 L 24 19.967 L 0 19.967 Z" fill="transparent" height="19.966638865721507px" id="luWh7OxMT" transform="translate(0 0)" width="24px"/><g d="M 5.915 0 L 0 0 L 0 13.069 L 5.915 13.069 Z M 10.219 12.964 L 4.303 12.964 L 4.303 19.967 L 10.219 19.967 Z M 18.823 12.964 L 12.908 12.964 L 12.908 19.967 L 18.823 19.967 Z M 14.52 0 L 8.604 0 L 8.604 13.069 L 14.519 13.069 L 14.519 0 Z M 23.126 0 L 17.211 0 L 17.211 13.069 L 23.126 13.069 Z" fill="transparent" height="19.966638552944914px" id="O0iI4AXxI" transform="translate(0.4 0)" width="23.126000442504903px"><path d="M 5.915 0 L 0 0 L 0 13.069 L 5.915 13.069 Z" fill="rgb(255, 255, 255)" height="13.069163469557907px" id="yOL1w2xOG" transform="translate(0 0)" width="5.9150000000000205px"/><path d="M 5.916 0 L 0 0 L 0 7.002 L 5.916 7.002 Z M 14.52 0 L 8.605 0 L 8.605 7.002 L 14.52 7.002 Z" fill="rgb(255, 255, 255)" height="7.00230025033261px" id="s7BLn9g07" transform="translate(4.303 12.964)" width="14.519999542236349px"/><path d="M 5.916 0 L 0 0 L 0 13.069 L 5.915 13.069 L 5.915 0 Z M 14.522 0 L 8.607 0 L 8.607 13.069 L 14.522 13.069 Z" fill="rgb(255, 255, 255)" height="13.069163470797548px" id="MuHEGcTYH" transform="translate(8.604 0)" width="14.522000350952169px"/></g></g></g></g><g d="M 8.75 12.479 C 12.202 12.479 15 9.686 15 6.24 C 15 2.794 12.202 0 8.75 0 C 5.298 0 2.5 2.794 2.5 6.24 C 2.5 9.686 5.298 12.479 8.75 12.479 Z M 13.17 10.652 L 17.5 14.975 M 0 45.424 L 20 45.424 L 20 65.391 L 0 65.391 Z M 10 51.664 L 10 55.407 L 13.125 57.279 M 5.625 53.536 L 2.5 53.536 L 2.5 50.416 M 5.281 60.399 C 6.768 61.802 8.804 62.47 10.835 62.222 C 12.865 61.974 14.68 60.836 15.784 59.116 C 17.675 56.166 17.038 52.268 14.306 50.07 C 11.574 47.873 7.623 48.082 5.138 50.555 C 4.218 51.484 3.459 52.361 2.5 53.536 M 17.625 98.835 L 2.625 98.835 C 2.28 98.835 2 99.114 2 99.459 L 2 108.194 C 2 108.539 2.28 108.818 2.625 108.818 L 17.625 108.818 C 17.97 108.818 18.25 108.539 18.25 108.194 L 18.25 99.459 C 18.25 99.114 17.97 98.835 17.625 98.835 Z M 2 102.579 L 18.25 102.579 M 5.75 101.331 L 5.75 103.827 M 14.5 101.331 L 14.5 103.827 M 13.25 98.835 L 13.25 97.587 C 13.25 96.898 12.69 96.339 12 96.339 L 8.25 96.339 C 7.56 96.34 7.001 96.898 7 97.587 L 7 98.835 M 11.925 143.76 L 3.595 143.76 C 2.991 143.76 2.5 144.25 2.5 144.854 L 2.5 157.333 C 2.5 157.937 2.99 158.427 3.596 158.427 L 16.096 158.427 C 16.701 158.427 17.192 157.937 17.192 157.333 L 17.192 149.018 L 17.122 149.207 C 16.976 149.603 16.654 149.908 16.25 150.034 L 16.25 157.333 C 16.25 157.418 16.181 157.487 16.096 157.487 L 3.596 157.487 C 3.511 157.487 3.442 157.418 3.442 157.333 L 3.442 144.854 C 3.442 144.769 3.511 144.7 3.596 144.7 L 10.907 144.7 C 11.032 144.297 11.338 143.975 11.735 143.83 Z M 7.57 150.249 C 8.26 150.249 8.82 149.69 8.82 149.001 C 8.82 148.312 8.26 147.753 7.57 147.753 C 6.88 147.753 6.32 148.312 6.32 149.001 C 6.32 149.69 6.88 150.249 7.57 150.249 Z M 4.5 158.36 L 13.066 149.807 C 13.183 149.689 13.342 149.623 13.508 149.624 C 13.674 149.623 13.833 149.689 13.95 149.807 L 16.945 152.799 M 13.633 145.257 L 15.016 144.748 C 15.236 144.667 15.409 144.494 15.49 144.275 L 16 142.894 L 16.51 144.275 C 16.591 144.494 16.764 144.667 16.984 144.748 L 18.367 145.257 L 16.984 145.766 C 16.764 145.847 16.591 146.02 16.51 146.24 L 16 147.62 L 15.49 146.24 C 15.409 146.02 15.236 145.847 15.016 145.766 Z M 12.236 145.595 L 14.739 146.515 L 15.662 149.016 C 15.714 149.158 15.849 149.251 16 149.251 C 16.151 149.251 16.286 149.157 16.338 149.016 L 17.26 146.515 L 19.765 145.595 C 19.906 145.542 19.999 145.408 19.999 145.257 C 19.999 145.107 19.906 144.973 19.765 144.92 L 17.26 143.999 L 16.338 141.499 C 16.286 141.357 16.151 141.263 16 141.264 C 15.849 141.264 15.714 141.357 15.662 141.499 L 14.74 143.999 L 12.235 144.92 C 12.095 144.973 12.001 145.107 12 145.257 C 12 145.408 12.094 145.542 12.235 145.595 Z M 12.5 199.666 L 8.5 197.171 L 8.5 202.162 Z M 3.153 193.618 C 3.142 193.618 3.1 193.622 3.045 193.694 C 2.989 193.767 2.942 193.887 2.942 194.04 L 2.942 204.736 C 2.939 204.859 2.975 204.98 3.045 205.081 C 3.1 205.153 3.143 205.157 3.153 205.157 L 16.789 205.157 C 16.799 205.157 16.842 205.153 16.897 205.081 C 16.967 204.98 17.003 204.859 17 204.736 L 17 197.503 C 17.107 197.38 17.19 197.238 17.247 197.085 L 17.942 195.203 L 17.942 204.736 C 17.946 205.065 17.842 205.387 17.645 205.651 C 17.454 205.902 17.155 206.098 16.789 206.098 L 3.153 206.098 C 2.786 206.098 2.488 205.902 2.296 205.651 C 2.105 205.401 2 205.076 2 204.736 L 2 194.04 C 2 193.699 2.105 193.374 2.296 193.124 C 2.488 192.874 2.787 192.678 3.153 192.678 L 11.005 192.678 C 10.932 192.996 10.977 193.33 11.13 193.618 Z M 13.633 193.177 L 15.016 192.668 C 15.236 192.587 15.409 192.414 15.49 192.195 L 16 190.814 L 16.51 192.195 C 16.591 192.414 16.764 192.587 16.984 192.668 L 18.367 193.177 L 16.984 193.686 C 16.764 193.767 16.591 193.94 16.51 194.16 L 16 195.54 L 15.49 194.16 C 15.409 193.94 15.236 193.767 15.016 193.686 Z M 12.236 193.515 L 14.739 194.435 L 15.662 196.936 C 15.714 197.077 15.849 197.171 16 197.171 C 16.151 197.171 16.286 197.077 16.338 196.936 L 17.26 194.435 L 19.765 193.515 C 19.906 193.462 19.999 193.327 19.999 193.177 C 19.999 193.027 19.906 192.893 19.765 192.84 L 17.26 191.919 L 16.338 189.419 C 16.286 189.277 16.151 189.183 16 189.184 C 15.849 189.184 15.714 189.277 15.662 189.419 L 14.74 191.919 L 12.235 192.84 C 12.095 192.893 12.001 193.027 12 193.177 C 12 193.328 12.094 193.462 12.235 193.515 Z M 0 237.104 L 20 237.104 L 20 257.07 L 0 257.07 Z M 10.3 239.054 C 10.113 238.952 9.887 238.952 9.7 239.054 L 2.825 242.811 C 2.626 242.921 2.501 243.13 2.5 243.357 L 2.5 250.817 C 2.5 251.045 2.625 251.254 2.825 251.363 M 10.526 238.643 C 10.199 238.465 9.803 238.465 9.476 238.643 C 9.267 238.776 9.197 239.048 9.316 239.264 C 9.434 239.481 9.701 239.569 9.926 239.465 C 9.973 239.439 10.029 239.439 10.076 239.465 L 11.366 240.17 C 11.51 240.016 11.689 239.897 11.889 239.823 L 12.364 239.649 Z M 14.372 244.247 L 10 246.636 L 2.78 242.691 C 2.553 242.568 2.269 242.651 2.145 242.878 C 2.021 243.104 2.104 243.388 2.33 243.512 L 9.775 247.58 C 9.915 247.656 10.085 247.656 10.225 247.58 L 14.7 245.134 Z M 10 247.173 L 10 255.2 M 17.968 243.326 L 17.276 245.2 C 17.22 245.353 17.136 245.494 17.031 245.616 L 17.031 250.817 C 17.031 250.845 17.023 250.873 17.009 250.897 C 16.995 250.921 16.974 250.94 16.95 250.954 L 10.075 254.711 C 10.052 254.724 10.026 254.731 10 254.73 C 9.974 254.731 9.948 254.724 9.925 254.711 L 3.05 250.954 C 3 250.927 2.968 250.874 2.969 250.817 C 2.952 250.57 2.747 250.379 2.499 250.379 C 2.251 250.38 2.047 250.572 2.031 250.819 C 2.033 251.217 2.251 251.583 2.6 251.774 L 9.475 255.532 C 9.802 255.71 10.198 255.71 10.525 255.532 L 17.4 251.774 C 17.75 251.583 17.968 251.217 17.969 250.819 L 17.969 243.358 Z M 13.633 241.097 L 15.016 240.588 C 15.236 240.507 15.409 240.334 15.49 240.115 L 16 238.734 L 16.51 240.115 C 16.591 240.334 16.764 240.507 16.984 240.588 L 18.368 241.097 L 16.984 241.606 C 16.764 241.687 16.591 241.86 16.51 242.08 L 16 243.46 L 15.49 242.08 C 15.409 241.86 15.236 241.687 15.016 241.606 Z M 12.236 241.435 L 14.74 242.355 L 15.662 244.856 C 15.714 244.997 15.849 245.091 16 245.09 C 16.151 245.09 16.285 244.997 16.338 244.856 L 17.261 242.355 L 19.765 241.435 C 19.907 241.383 20.001 241.248 20.001 241.097 C 20.001 240.946 19.907 240.812 19.765 240.76 L 17.261 239.839 L 16.338 237.338 C 16.3 237.234 16.215 237.153 16.108 237.12 C 16.001 237.086 15.885 237.104 15.794 237.169 C 15.734 237.211 15.688 237.27 15.663 237.338 L 14.74 239.839 L 12.236 240.76 C 12.095 240.812 12.002 240.947 12.002 241.097 C 12.002 241.247 12.095 241.382 12.236 241.435 Z M 6.708 298.667 L 2.405 297.084 C 2.163 296.993 2.002 296.763 2 296.505 C 2 296.246 2.161 296.014 2.404 295.925 L 6.708 294.341 L 8.294 290.044 C 8.385 289.803 8.616 289.643 8.875 289.643 C 9.133 289.643 9.364 289.803 9.455 290.044 L 11.041 294.341 L 15.345 295.925 C 15.587 296.015 15.747 296.246 15.747 296.504 C 15.747 296.762 15.587 296.993 15.345 297.084 L 11.041 298.667 L 9.455 302.964 C 9.368 303.209 9.136 303.374 8.875 303.374 C 8.614 303.374 8.382 303.209 8.295 302.964 Z M 13.875 286.521 L 13.875 290.265 M 17.625 290.889 L 17.625 293.385 M 12 288.393 L 15.75 288.393 M 16.375 292.137 L 18.875 292.137" fill="transparent" height="303.3736319716113px" id="u9002EuHb" transform="translate(17.5 106.842)" width="20.001080376150355px"><path d="M 6.25 12.479 C 9.702 12.479 12.5 9.686 12.5 6.24 C 12.5 2.794 9.702 0 6.25 0 C 2.798 0 0 2.794 0 6.24 C 0 9.686 2.798 12.479 6.25 12.479 Z M 10.67 10.652 L 15 14.975" fill="transparent" height="14.974978966955632px" id="NEaif7ts6" stroke-dasharray="" stroke-linecap="round" stroke-linejoin="round" stroke-width="0.938" stroke="rgba(255, 255, 255, 0.8)" transform="translate(2.5 0)" width="15px"/><g d="M 0 0 L 20 0 L 20 19.967 L 0 19.967 Z M 10 6.24 L 10 9.983 L 13.125 11.855 M 5.625 8.111 L 2.5 8.111 L 2.5 4.992 M 5.281 14.975 C 6.768 16.378 8.804 17.046 10.835 16.798 C 12.865 16.55 14.68 15.411 15.784 13.692 C 17.675 10.742 17.038 6.844 14.306 4.646 C 11.574 2.449 7.623 2.658 5.138 5.13 C 4.218 6.06 3.459 6.936 2.5 8.111" fill="transparent" height="19.96663886697661px" id="sK1k5jtfN" transform="translate(0 45.424)" width="20px"><path d="M 0 0 L 20 0 L 20 19.967 L 0 19.967 Z" fill="transparent" height="19.966638865721507px" id="qgDksZYJb" transform="translate(0 0)" width="20px"/><g d="M 7.5 3.112 L 7.5 6.856 L 10.625 8.728 M 3.125 4.984 L 0 4.984 L 0 1.864 M 2.781 11.847 C 4.268 13.25 6.304 13.919 8.335 13.671 C 10.365 13.422 12.18 12.284 13.284 10.565 C 15.175 7.614 14.538 3.716 11.806 1.519 C 9.074 -0.678 5.123 -0.47 2.638 2.003 C 1.718 2.932 0.959 3.809 0 4.984" fill="transparent" height="13.721320069780639px" id="AkUEBcCZE" transform="translate(2.5 3.128)" width="14.368721120464789px"><path d="M 7.5 1.248 L 7.5 4.992 L 10.625 6.864 M 3.125 3.12 L 0 3.12 L 0 0" fill="transparent" height="6.863532091300613px" id="Nhnyak6N_" stroke-dasharray="" stroke-linecap="round" stroke-linejoin="round" stroke-width="0.938" stroke="rgba(255, 255, 255, 0.64)" transform="translate(0 1.864)" width="10.625px"/><path d="M 2.781 11.847 C 4.268 13.25 6.304 13.919 8.335 13.671 C 10.365 13.422 12.18 12.284 13.284 10.565 C 15.175 7.614 14.538 3.716 11.806 1.519 C 9.074 -0.678 5.123 -0.47 2.638 2.003 C 1.718 2.932 0.959 3.809 0 4.984" fill="transparent" height="13.721320066201262px" id="jlGnHEZGi" stroke-dasharray="" stroke-linecap="round" stroke-linejoin="round" stroke-width="0.938" stroke="rgba(255, 255, 255, 0.64)" transform="translate(0 0)" width="14.368721120464789px"/></g></g><path d="M 15.625 2.496 L 0.625 2.496 C 0.28 2.496 0 2.775 0 3.12 L 0 11.855 C 0 12.2 0.28 12.479 0.625 12.479 L 15.625 12.479 C 15.97 12.479 16.25 12.2 16.25 11.855 L 16.25 3.12 C 16.25 2.775 15.97 2.496 15.625 2.496 Z M 0 6.24 L 16.25 6.24 M 3.75 4.992 L 3.75 7.487 M 12.5 4.992 L 12.5 7.487 M 11.25 2.496 L 11.25 1.248 C 11.25 0.559 10.69 0 10 0 L 6.25 0 C 5.56 0.001 5.001 0.559 5 1.248 L 5 2.496" fill="transparent" height="12.479149253493688px" id="AEZiGcxel" stroke-dasharray="" stroke-linecap="round" stroke-linejoin="round" stroke-width="0.942" stroke="rgba(255, 255, 255, 0.8)" transform="translate(2 96.339)" width="16.25px"/><path d="M 9.425 0 L 1.095 0 C 0.491 0 0 0.49 0 1.094 L 0 13.573 C 0 14.177 0.49 14.667 1.096 14.667 L 13.596 14.667 C 14.201 14.667 14.692 14.177 14.692 13.573 L 14.692 5.258 L 14.622 5.447 C 14.476 5.843 14.154 6.149 13.75 6.275 L 13.75 13.573 C 13.75 13.658 13.681 13.727 13.596 13.727 L 1.096 13.727 C 1.011 13.727 0.942 13.658 0.942 13.573 L 0.942 1.094 C 0.942 1.009 1.011 0.94 1.096 0.94 L 8.407 0.94 C 8.532 0.537 8.838 0.216 9.235 0.07 Z" fill="rgba(255, 255, 255, 0.8)" height="14.667492910758938px" id="fTh8YNtLX" transform="translate(2.5 143.76)" width="14.692000000000007px"/><path d="M 3.07 2.496 C 3.76 2.496 4.32 1.937 4.32 1.248 C 4.32 0.559 3.76 0 3.07 0 C 2.38 0 1.82 0.559 1.82 1.248 C 1.82 1.937 2.38 2.496 3.07 2.496 Z M 0 10.607 L 8.566 2.054 C 8.683 1.936 8.842 1.87 9.008 1.871 C 9.174 1.87 9.333 1.936 9.45 2.054 L 12.445 5.046" fill="transparent" height="10.607276738462684px" id="AR03HEhul" stroke-dasharray="" stroke-linecap="round" stroke-linejoin="round" stroke-width="0.942" stroke="rgba(255, 255, 255, 0.8)" transform="translate(4.5 147.753)" width="12.444999999999993px"/><path d="M 1.633 3.993 L 3.016 3.484 C 3.236 3.403 3.409 3.23 3.49 3.011 L 4 1.63 L 4.51 3.011 C 4.591 3.23 4.764 3.403 4.984 3.484 L 6.367 3.993 L 4.984 4.502 C 4.764 4.583 4.591 4.756 4.51 4.976 L 4 6.356 L 3.49 4.976 C 3.409 4.756 3.236 4.583 3.016 4.502 Z M 0.236 4.331 L 2.739 5.251 L 3.662 7.752 C 3.714 7.894 3.849 7.987 4 7.987 C 4.151 7.987 4.286 7.893 4.338 7.752 L 5.26 5.251 L 7.765 4.331 C 7.906 4.278 7.999 4.144 7.999 3.993 C 7.999 3.843 7.906 3.709 7.765 3.656 L 5.26 2.735 L 4.338 0.235 C 4.286 0.093 4.151 -0.001 4 0 C 3.849 0 3.714 0.093 3.662 0.235 L 2.74 2.735 L 0.235 3.656 C 0.095 3.709 0.001 3.843 0 3.993 C 0 4.144 0.094 4.278 0.235 4.331 Z" fill="rgba(255, 255, 255, 0.8)" height="7.9866645697711105px" id="EtnctFJG9" transform="translate(12 141.264)" width="7.999204889684165px"/><path d="M 4 2.496 L 0 0 L 0 4.992 Z" fill="transparent" height="4.991659716430377px" id="migfp8tGz" stroke-dasharray="" stroke-linecap="round" stroke-linejoin="round" stroke-width="0.942" stroke="rgba(255, 255, 255, 0.8)" transform="translate(8.5 197.171)" width="4px"/><path d="M 1.153 0.94 C 1.142 0.94 1.1 0.944 1.045 1.016 C 0.989 1.089 0.942 1.209 0.942 1.362 L 0.942 12.058 C 0.939 12.181 0.975 12.302 1.045 12.403 C 1.1 12.475 1.143 12.479 1.153 12.479 L 14.789 12.479 C 14.799 12.479 14.842 12.475 14.897 12.403 C 14.967 12.302 15.003 12.181 15 12.058 L 15 4.825 C 15.107 4.702 15.19 4.56 15.247 4.407 L 15.942 2.525 L 15.942 12.058 C 15.946 12.387 15.842 12.709 15.645 12.973 C 15.454 13.224 15.155 13.42 14.789 13.42 L 1.153 13.42 C 0.786 13.42 0.488 13.224 0.296 12.973 C 0.105 12.723 0 12.398 0 12.058 L 0 1.362 C 0 1.021 0.105 0.696 0.296 0.446 C 0.488 0.196 0.787 0 1.153 0 L 9.005 0 C 8.932 0.318 8.977 0.652 9.13 0.94 Z" fill="rgba(255, 255, 255, 0.8)" height="13.419577991966662px" id="hmtchsZPi" transform="translate(2 192.678)" width="15.942102256775469px"/><path d="M 1.633 3.993 L 3.016 3.484 C 3.236 3.403 3.409 3.23 3.49 3.011 L 4 1.63 L 4.51 3.011 C 4.591 3.23 4.764 3.403 4.984 3.484 L 6.367 3.993 L 4.984 4.502 C 4.764 4.583 4.591 4.756 4.51 4.976 L 4 6.356 L 3.49 4.976 C 3.409 4.756 3.236 4.583 3.016 4.502 Z M 0.236 4.331 L 2.739 5.251 L 3.662 7.752 C 3.714 7.894 3.849 7.987 4 7.987 C 4.151 7.987 4.286 7.893 4.338 7.752 L 5.26 5.251 L 7.765 4.331 C 7.906 4.278 7.999 4.144 7.999 3.993 C 7.999 3.843 7.906 3.709 7.765 3.656 L 5.26 2.735 L 4.338 0.235 C 4.286 0.093 4.151 -0.001 4 0 C 3.849 0 3.714 0.093 3.662 0.235 L 2.74 2.735 L 0.235 3.656 C 0.095 3.709 0.001 3.843 0 3.993 C 0 4.144 0.094 4.278 0.235 4.331 Z" fill="rgba(255, 255, 255, 0.8)" height="7.986664576457764px" id="UZxAhOEoM" transform="translate(12 189.184)" width="7.999204889684108px"/><g d="M 0 0.001 L 20 0.001 L 20 19.967 L 0 19.967 Z M 10.3 1.95 C 10.113 1.849 9.887 1.849 9.7 1.95 L 2.825 5.708 C 2.626 5.818 2.501 6.027 2.5 6.254 L 2.5 13.714 C 2.5 13.941 2.625 14.151 2.825 14.26 M 10.526 1.54 C 10.199 1.361 9.803 1.361 9.476 1.54 C 9.267 1.673 9.197 1.944 9.316 2.161 C 9.434 2.378 9.701 2.466 9.926 2.362 C 9.973 2.336 10.029 2.336 10.076 2.362 L 11.366 3.066 C 11.51 2.913 11.689 2.794 11.889 2.72 L 12.364 2.545 Z M 14.372 7.144 L 10 9.533 L 2.78 5.587 C 2.553 5.465 2.269 5.548 2.145 5.774 C 2.021 6.001 2.104 6.284 2.33 6.409 L 9.775 10.477 C 9.915 10.553 10.085 10.553 10.225 10.477 L 14.7 8.031 Z M 10 10.07 L 10 18.096 M 17.968 6.223 L 17.276 8.097 C 17.22 8.25 17.136 8.391 17.031 8.512 L 17.031 13.714 C 17.031 13.742 17.023 13.769 17.009 13.794 C 16.995 13.817 16.974 13.837 16.95 13.85 L 10.075 17.608 C 10.052 17.621 10.026 17.627 10 17.627 C 9.974 17.627 9.948 17.621 9.925 17.608 L 3.05 13.85 C 3 13.824 2.968 13.771 2.969 13.714 C 2.952 13.467 2.747 13.276 2.499 13.276 C 2.251 13.277 2.047 13.469 2.031 13.716 C 2.033 14.114 2.251 14.48 2.6 14.671 L 9.475 18.429 C 9.802 18.607 10.198 18.607 10.525 18.429 L 17.4 14.671 C 17.75 14.48 17.968 14.114 17.969 13.716 L 17.969 6.255 Z M 13.633 3.994 L 15.016 3.485 C 15.236 3.404 15.409 3.231 15.49 3.012 L 16 1.631 L 16.51 3.012 C 16.591 3.231 16.764 3.404 16.984 3.485 L 18.368 3.994 L 16.984 4.503 C 16.764 4.584 16.591 4.757 16.51 4.976 L 16 6.357 L 15.49 4.976 C 15.409 4.757 15.236 4.584 15.016 4.503 Z M 12.236 4.331 L 14.74 5.252 L 15.662 7.753 C 15.714 7.894 15.849 7.988 16 7.987 C 16.151 7.987 16.285 7.894 16.338 7.753 L 17.261 5.252 L 19.765 4.331 C 19.907 4.279 20.001 4.145 20.001 3.994 C 20.001 3.843 19.907 3.708 19.765 3.656 L 17.261 2.736 L 16.338 0.235 C 16.3 0.13 16.215 0.05 16.108 0.016 C 16.001 -0.017 15.885 0.001 15.794 0.065 C 15.734 0.107 15.688 0.167 15.663 0.235 L 14.74 2.736 L 12.236 3.656 C 12.095 3.709 12.002 3.844 12.002 3.994 C 12.002 4.144 12.095 4.279 12.236 4.331 Z" fill="transparent" height="19.967239867911303px" id="QeoMSj_4z" transform="translate(0 237.103)" width="20.001080376150355px"><path d="M 0 0 L 20 0 L 20 19.967 L 0 19.967 Z" fill="transparent" height="19.966638865721507px" id="B7g_JgJhu" transform="translate(0 0.001)" width="20px"/><path d="M 7.8 0.076 C 7.613 -0.025 7.387 -0.025 7.2 0.076 L 0.325 3.834 C 0.126 3.944 0.001 4.153 0 4.38 L 0 11.84 C 0 12.067 0.125 12.276 0.325 12.386" fill="transparent" height="12.385595535999357px" id="eKRC_7hAi" stroke-dasharray="" stroke-linecap="round" stroke-linejoin="round" stroke-width="0.938" stroke="rgba(255, 255, 255, 0.8)" transform="translate(2.5 1.874)" width="7.800000000000011px"/><path d="M 8.438 0.134 C 8.111 -0.045 7.716 -0.045 7.388 0.134 C 7.179 0.267 7.109 0.538 7.228 0.755 C 7.347 0.972 7.614 1.06 7.838 0.956 C 7.885 0.929 7.942 0.929 7.988 0.956 L 9.278 1.66 C 9.422 1.507 9.601 1.388 9.801 1.314 L 10.276 1.139 Z M 12.284 5.738 L 7.912 8.127 L 0.692 4.181 C 0.465 4.058 0.181 4.142 0.058 4.368 C -0.066 4.595 0.016 4.878 0.242 5.003 L 7.687 9.071 C 7.827 9.147 7.997 9.147 8.137 9.071 L 12.612 6.625 Z" fill="rgba(255, 255, 255, 0.8)" height="9.127951188854055px" id="E4sPLWY1S" transform="translate(2.088 1.406)" width="12.612387248278365px"/><path d="M 0 0 L 0 8.027" fill="transparent" height="8.02658882402011px" id="nWwQSMN6Q" stroke-dasharray="" stroke-linecap="round" stroke-linejoin="round" stroke-width="0.938" stroke="rgba(255, 255, 255, 0.8)" transform="translate(10 10.07)" width="1px"/><path d="M 15.937 0 L 15.245 1.874 C 15.189 2.027 15.105 2.167 15 2.289 L 15 7.49 C 15 7.519 14.992 7.546 14.978 7.57 C 14.964 7.594 14.943 7.614 14.919 7.627 L 8.044 11.385 C 8.021 11.398 7.995 11.404 7.969 11.404 C 7.943 11.404 7.917 11.398 7.894 11.385 L 1.019 7.627 C 0.969 7.6 0.937 7.548 0.938 7.49 C 0.921 7.244 0.716 7.052 0.468 7.053 C 0.22 7.053 0.016 7.246 0 7.492 C 0.002 7.891 0.22 8.256 0.569 8.448 L 7.444 12.206 C 7.771 12.384 8.167 12.384 8.494 12.206 L 15.369 8.448 C 15.719 8.257 15.937 7.891 15.938 7.492 L 15.938 0.032 Z" fill="rgba(255, 255, 255, 0.8)" height="12.339306546163243px" id="I4Kd7gobR" transform="translate(2.031 6.223)" width="15.937999999999988px"/><path d="M 1.631 3.994 L 3.014 3.485 C 3.234 3.404 3.407 3.231 3.488 3.012 L 3.998 1.631 L 4.508 3.012 C 4.589 3.231 4.762 3.404 4.982 3.485 L 6.366 3.994 L 4.982 4.503 C 4.762 4.584 4.589 4.757 4.508 4.976 L 3.998 6.357 L 3.488 4.976 C 3.407 4.757 3.234 4.584 3.014 4.503 Z M 0.234 4.331 L 2.738 5.252 L 3.66 7.753 C 3.712 7.894 3.847 7.988 3.998 7.987 C 4.149 7.987 4.284 7.894 4.336 7.753 L 5.259 5.252 L 7.763 4.331 C 7.905 4.279 7.999 4.145 7.999 3.994 C 7.999 3.843 7.905 3.708 7.763 3.656 L 5.259 2.736 L 4.336 0.235 C 4.298 0.13 4.213 0.05 4.106 0.016 C 4 -0.017 3.883 0.001 3.792 0.065 C 3.732 0.107 3.686 0.167 3.661 0.235 L 2.738 2.736 L 0.234 3.656 C 0.093 3.709 0 3.844 0 3.994 C 0 4.144 0.093 4.279 0.234 4.331 Z" fill="rgba(255, 255, 255, 0.8)" height="7.98726106125723px" id="KQb6um0l5" transform="translate(12.002 0)" width="7.999285561086879px"/></g><path d="M 4.708 12.146 L 0.405 10.562 C 0.163 10.472 0.002 10.242 0 9.983 C 0 9.725 0.161 9.493 0.404 9.403 L 4.708 7.82 L 6.294 3.523 C 6.385 3.282 6.616 3.122 6.875 3.122 C 7.133 3.122 7.364 3.282 7.455 3.523 L 9.041 7.82 L 13.345 9.403 C 13.587 9.494 13.747 9.725 13.747 9.983 C 13.747 10.241 13.587 10.472 13.345 10.562 L 9.041 12.146 L 7.455 16.443 C 7.368 16.688 7.136 16.852 6.875 16.852 C 6.614 16.852 6.382 16.688 6.295 16.443 Z M 11.875 0 L 11.875 3.744 M 15.625 4.368 L 15.625 6.864 M 10 1.872 L 13.75 1.872 M 14.375 5.616 L 16.875 5.616" fill="transparent" height="16.852330702080053px" id="bGOZnuCbu" stroke-dasharray="" stroke-linecap="round" stroke-linejoin="round" stroke-width="0.942" stroke="rgba(255, 255, 255, 0.8)" transform="translate(2 286.521)" width="16.875px"/></g><g d="M 13.625 0 L 3.625 0 C 3.458 0 3.299 0.067 3.182 0.185 C 3.064 0.303 2.999 0.463 3 0.629 L 3 10.612 C 3 10.962 3.28 11.231 3.625 11.231 L 13.625 11.231 C 13.97 11.231 14.25 10.962 14.25 10.612 L 14.25 0.629 C 14.25 0.28 13.97 0 13.625 0 Z M 6.75 4.992 C 7.44 4.992 8 4.433 8 3.744 C 8 3.054 7.44 2.496 6.75 2.496 C 6.06 2.496 5.5 3.054 5.5 3.744 C 5.5 4.433 6.06 4.992 6.75 4.992 Z M 11.75 11.231 L 11.75 13.108 C 11.751 13.273 11.685 13.432 11.567 13.548 C 11.45 13.664 11.29 13.729 11.125 13.727 L 1.125 13.727 C 0.96 13.729 0.8 13.664 0.683 13.548 C 0.565 13.432 0.499 13.273 0.5 13.108 L 0.5 3.125 C 0.5 2.955 0.566 2.805 0.683 2.685 C 0.799 2.565 0.958 2.497 1.125 2.496 L 3 2.496 M 5 11.241 L 11.066 5.181 C 11.123 5.121 11.192 5.073 11.269 5.041 C 11.345 5.01 11.427 4.993 11.509 4.992 C 11.591 4.993 11.672 5.01 11.748 5.041 C 11.825 5.073 11.894 5.121 11.951 5.181 L 14.321 7.547 M 7.281 71.942 C 7.712 71.942 8.062 71.593 8.062 71.162 C 8.062 70.732 7.712 70.382 7.281 70.382 C 6.85 70.382 6.5 70.732 6.5 71.162 C 6.5 71.593 6.85 71.942 7.281 71.942 Z M 7.5 68.386 L 7.5 67.757 C 8.88 67.757 10 66.788 10 65.58 C 10 64.372 8.88 63.394 7.5 63.394 C 6.12 63.394 5 64.372 5 65.58 L 5 65.89 M 7.5 74.376 C 11.642 74.376 15 71.021 15 66.888 C 15 62.755 11.642 59.401 7.5 59.401 C 3.358 59.401 0 62.755 0 66.888 C 0 71.021 3.358 74.376 7.5 74.376 Z" fill="transparent" height="74.3757359852284px" id="uu51e80bB" transform="translate(20 1035.769)" width="15px"><path d="M 10.625 0 L 0.625 0 C 0.458 0 0.299 0.067 0.182 0.185 C 0.064 0.303 -0.001 0.463 0 0.629 L 0 10.612 C 0 10.962 0.28 11.231 0.625 11.231 L 10.625 11.231 C 10.97 11.231 11.25 10.962 11.25 10.612 L 11.25 0.629 C 11.25 0.28 10.97 0 10.625 0 Z" fill="transparent" height="11.231234361967836px" id="fsOAgIwR7" stroke-dasharray="" stroke-linecap="round" stroke-linejoin="round" stroke-width="0.938" stroke="rgba(255, 255, 255, 0.8)" transform="translate(3 0)" width="11.25001280255276px"/><path d="M 6.25 2.496 C 6.94 2.496 7.5 1.937 7.5 1.248 C 7.5 0.559 6.94 0 6.25 0 C 5.56 0 5 0.559 5 1.248 C 5 1.937 5.56 2.496 6.25 2.496 Z M 11.25 8.735 L 11.25 10.612 C 11.251 10.777 11.185 10.936 11.067 11.052 C 10.95 11.169 10.79 11.233 10.625 11.231 L 0.625 11.231 C 0.46 11.233 0.3 11.169 0.183 11.052 C 0.065 10.936 -0.001 10.777 0 10.612 L 0 0.629 C 0 0.459 0.066 0.309 0.183 0.19 C 0.299 0.07 0.458 0.001 0.625 0 L 2.5 0" fill="transparent" height="11.231274069561925px" id="WiKuexFKX" stroke-dasharray="" stroke-linecap="round" stroke-linejoin="round" stroke-width="0.938" stroke="rgba(255, 255, 255, 0.8)" transform="translate(0.5 2.496)" width="11.250006741794678px"/><path d="M 0 6.25 L 6.066 0.19 C 6.123 0.129 6.192 0.082 6.269 0.05 C 6.345 0.018 6.427 0.001 6.509 0 C 6.591 0.002 6.672 0.019 6.748 0.05 C 6.825 0.082 6.894 0.129 6.951 0.19 L 9.321 2.556" fill="transparent" height="6.249557964971245px" id="YYAWdPypJ" stroke-dasharray="" stroke-linecap="round" stroke-linejoin="round" stroke-width="0.938" stroke="rgba(255, 255, 255, 0.8)" transform="translate(5 4.992)" width="9.321000000000026px"/><path d="M 0.781 1.559 C 1.212 1.559 1.562 1.21 1.562 0.78 C 1.562 0.349 1.212 0 0.781 0 C 0.35 0 0 0.349 0 0.78 C 0 1.21 0.35 1.559 0.781 1.559 Z" fill="rgba(255, 255, 255, 0.8)" height="1.5593944954130166px" id="dOvb0tdTG" transform="translate(6.5 70.382)" width="1.5619999999998981px"/><path d="M 2.5 4.992 L 2.5 4.363 C 3.88 4.363 5 3.394 5 2.186 C 5 0.978 3.88 0 2.5 0 C 1.12 0 0 0.978 0 2.186 L 0 2.496" fill="transparent" height="4.991659716430149px" id="WY7vbT8B_" stroke-dasharray="" stroke-linecap="round" stroke-linejoin="round" stroke-width="0.938" stroke="rgba(255, 255, 255, 0.8)" transform="translate(5 63.394)" width="5px"/><path d="M 7.5 14.975 C 11.642 14.975 15 11.621 15 7.487 C 15 3.354 11.642 0 7.5 0 C 3.358 0 0 3.354 0 7.487 C 0 11.621 3.358 14.975 7.5 14.975 Z" fill="transparent" height="14.974979149290903px" id="OxX98Y36J" stroke-dasharray="" stroke-linecap="round" stroke-linejoin="round" stroke-width="0.938" stroke="rgba(255, 255, 255, 0.8)" transform="translate(0 59.401)" width="15px"/></g><g d="M 0 0 L 20 0 L 20 19.967 L 0 19.967 Z M 16.942 3.514 C 15.629 2.906 14.242 2.473 12.816 2.226 C 12.638 2.546 12.43 2.975 12.287 3.314 C 10.771 3.085 9.23 3.085 7.714 3.314 C 7.571 2.975 7.359 2.546 7.18 2.226 C 5.73 2.476 4.345 2.915 3.05 3.524 C 0.439 7.458 -0.269 11.301 0.085 15.085 C 1.817 16.383 3.495 17.161 5.145 17.68 C 5.553 17.121 5.916 16.522 6.229 15.893 C 5.635 15.673 5.063 15.396 4.523 15.065 C 4.666 14.965 4.806 14.845 4.941 14.735 C 8.231 16.273 11.807 16.273 15.059 14.735 C 15.196 14.845 15.336 14.965 15.477 15.065 C 14.937 15.394 14.364 15.674 13.767 15.893 C 14.081 16.522 14.442 17.121 14.851 17.68 C 16.503 17.161 18.183 16.383 19.915 15.085 C 20.33 10.702 19.205 6.888 16.942 3.514 Z M 6.678 12.759 C 5.69 12.759 4.88 11.84 4.88 10.722 C 4.88 9.594 5.673 8.676 6.678 8.676 C 7.683 8.676 8.493 9.594 8.476 10.722 C 8.477 11.84 7.683 12.759 6.678 12.759 Z M 13.322 12.759 C 12.334 12.759 11.524 11.84 11.524 10.722 C 11.524 9.594 12.317 8.676 13.322 8.676 C 14.328 8.676 15.138 9.594 15.12 10.722 C 15.12 11.84 14.328 12.759 13.322 12.759 Z" fill="transparent" height="19.966638862937543px" id="YGVNeTlrX" transform="translate(17.5 1152.574)" width="20px"><path d="M 0 0 L 20 0 L 20 19.967 L 0 19.967 Z" fill="transparent" height="19.966638865721507px" id="NpwpLPSgp" transform="translate(0 0)" width="20px"/><path d="M 16.942 1.288 C 15.629 0.68 14.242 0.247 12.816 0 C 12.638 0.319 12.43 0.749 12.287 1.088 C 10.771 0.859 9.23 0.859 7.714 1.088 C 7.571 0.749 7.359 0.319 7.18 0 C 5.73 0.25 4.345 0.689 3.05 1.298 C 0.439 5.231 -0.269 9.075 0.085 12.859 C 1.817 14.156 3.495 14.935 5.145 15.454 C 5.553 14.895 5.916 14.296 6.229 13.667 C 5.635 13.447 5.063 13.17 4.523 12.839 C 4.666 12.739 4.806 12.619 4.941 12.509 C 8.231 14.047 11.807 14.047 15.059 12.509 C 15.196 12.619 15.336 12.739 15.477 12.839 C 14.937 13.168 14.364 13.448 13.767 13.667 C 14.081 14.296 14.442 14.895 14.851 15.454 C 16.503 14.935 18.183 14.156 19.915 12.859 C 20.33 8.476 19.205 4.662 16.942 1.288 Z M 6.678 10.532 C 5.69 10.532 4.88 9.614 4.88 8.496 C 4.88 7.368 5.673 6.449 6.678 6.449 C 7.683 6.449 8.493 7.368 8.476 8.496 C 8.477 9.614 7.683 10.532 6.678 10.532 Z M 13.322 10.532 C 12.334 10.532 11.524 9.614 11.524 8.496 C 11.524 7.368 12.317 6.449 13.322 6.449 C 14.328 6.449 15.138 7.368 15.12 8.496 C 15.12 9.614 14.328 10.532 13.322 10.532 Z" fill="rgba(255, 255, 255, 0.8)" height="15.454178440409123px" id="lyW7YQNQT" transform="translate(0 2.226)" width="19.999833807405007px"/></g></g></svg>)
AI Mockup Machine
Access my
full workflow
↓
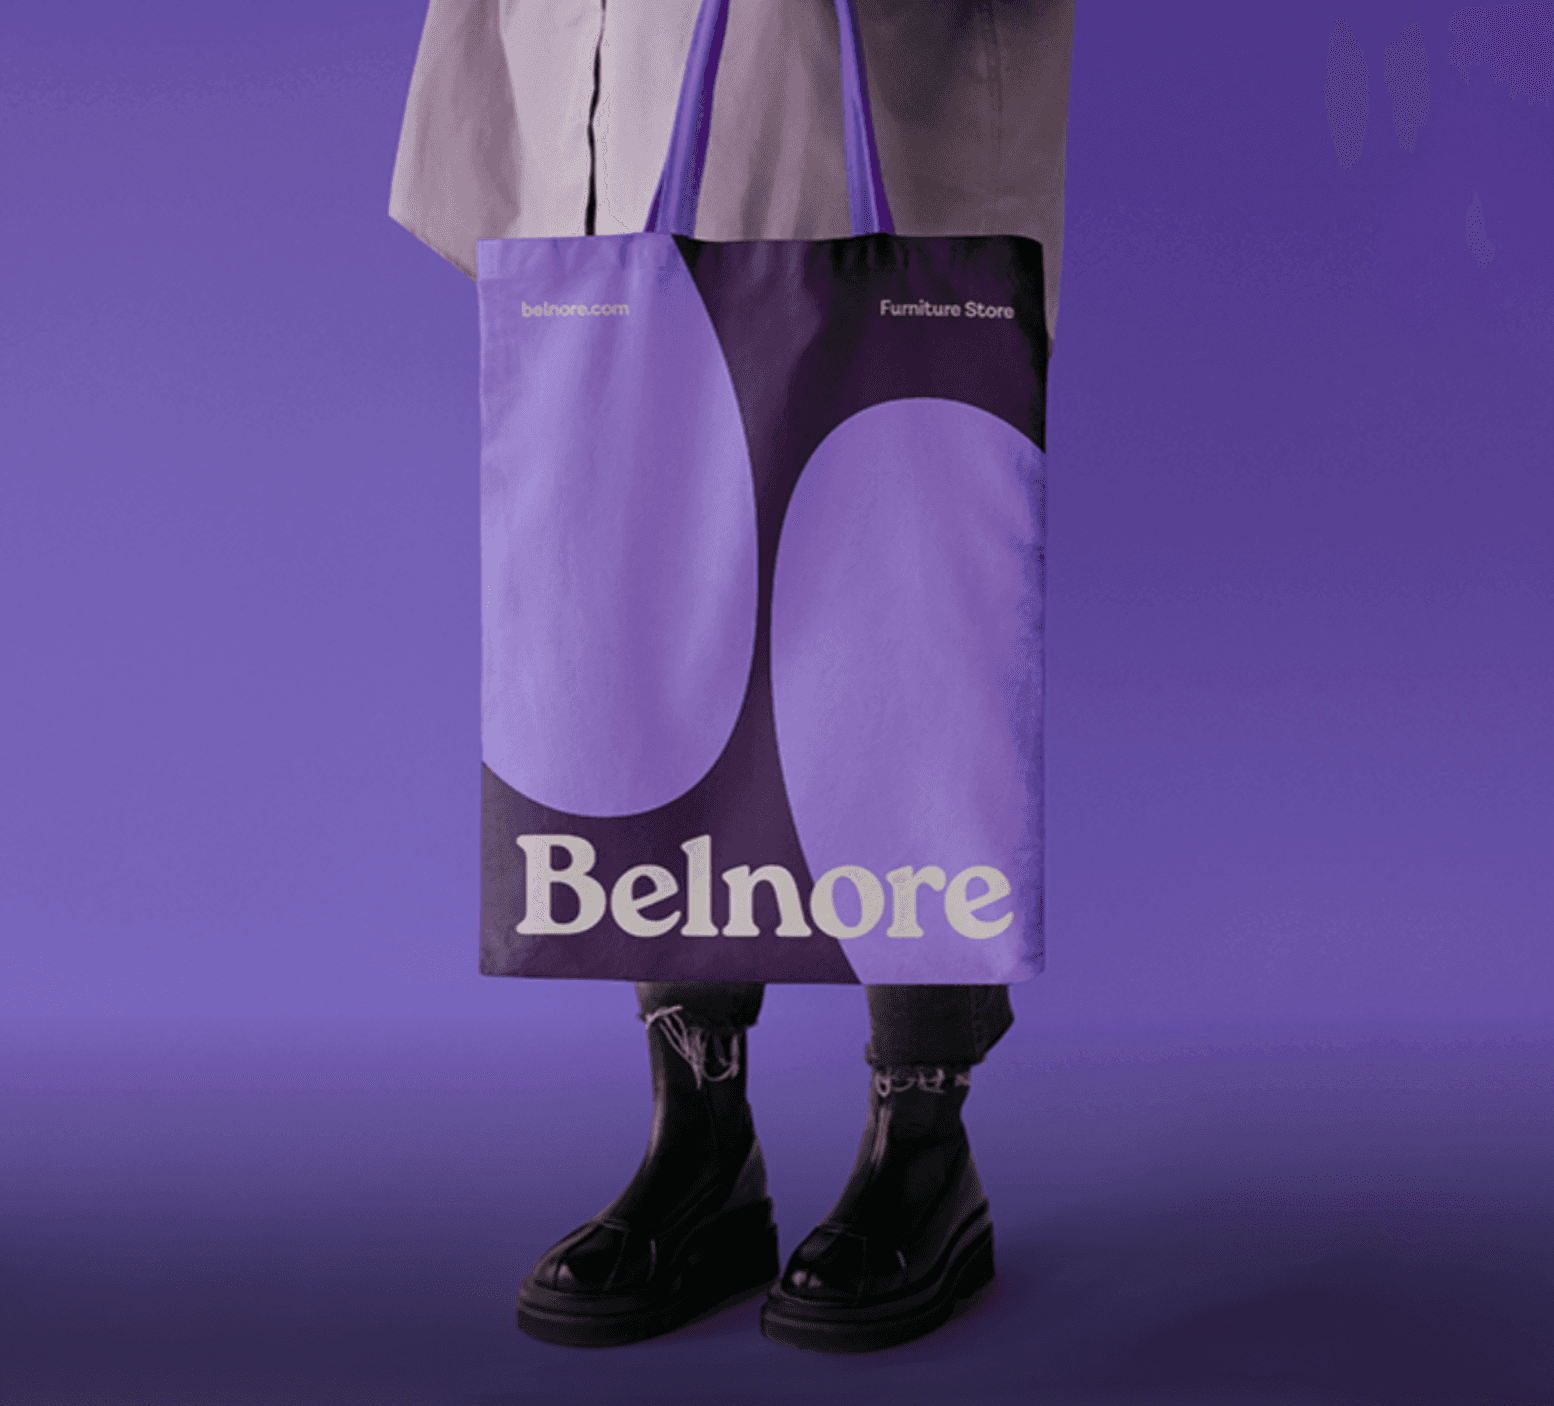
Upload Your Sources
Upload your flat design and a visual reference.
The system uses both to understand how the final mockup should look and behave.

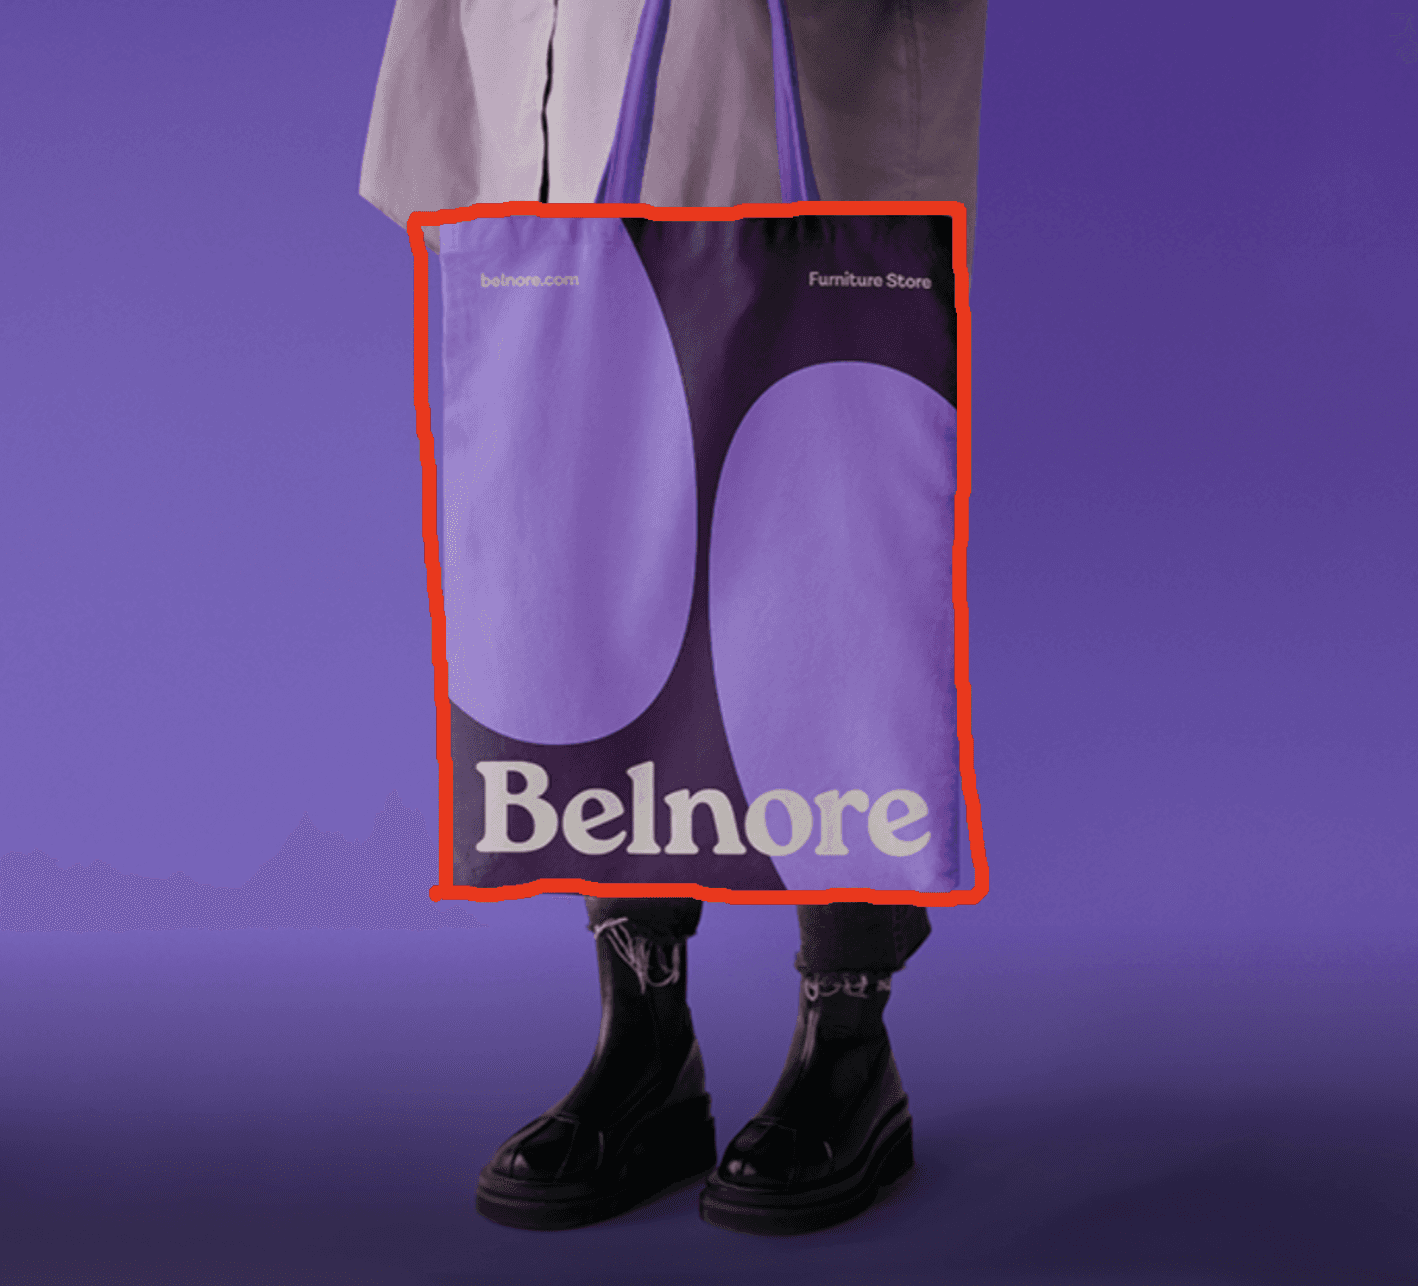
Define What to Replace
Mark the exact area where the design should appear.
This tells the model what to replace and how it should align with the surface.
Analyze the three provided images. Image 1: the flat design that must remain exactly unchanged. Image 2: the mockup environment where the design should appear. Image 3: the same mockup with a red marked area that indicates exactly where the design must be placed. Your task is to write a prompt for the Nano Banana image generation model. The prompt should instruct Nano Banana to generate a photorealistic image where the flat design appears naturally placed inside the mockup scene, exactly inside the red marked region. The design must remain exactly the same: do not change the text, layout, colors, typography, or graphic elements. Only adapt: * perspective * lighting * shadows * surface interaction * camera angle The design should appear as if it was physically printed and placed on the object in the mockup scene. Respect the shape and orientation of the masked area and match the environmental lighting of the mockup. Return only the Nano Banana prompt.
Generate the Prompt
Using a system prompt and 3 inputs (design, mockup, and mask from our previous steps), the system generates a precise prompt that instructs the image model how to place the design in the scene. This prompt is then used in our next step to generate the final mockup.
 STEP 4 - Generate the prompt
Photorealistic close-up of a black cotton sweatshirt featuring the provided graphic design integrated as thick, 3D, fluffy chenille patch embroidery. The green 'EQB' letters and 'EST 2018' text are rendered entirely in a highly tactile, plush, furry terry-cloth material, perfectly matching the raised, fuzzy texture of classic letterman jacket patches. The white outlines around the letters appear as dense, tight embroidery stitching anchoring the fluffy material to the garment. The dark background of the design blends away into the black fabric of the sweatshirt. Soft, directional studio lighting highlights the individual fibers and soft fuzz of the lettering, casting realistic micro-shadows from the thick, elevated patches onto the underlying knit fabric. The design flawlessly follows the angled perspective and subtle wrinkles of the garment. Macro photography, extreme texture detail, 8k resolution.
You are an expert AI Creative Director and Prompt Engineer. Your task is to generate a precise prompt for the Nano Banana image generation model. You will receive three images: 1. DESIGN IMAGE A flat graphic design that must remain EXACTLY the same in content. 2. MOCKUP IMAGE A real-world scene that contains a physical object (such as a billboard, poster stand, screen, sign, etc.). 3. MASK IMAGE The mockup image with a red marked area that indicates exactly where the design must appear. Your job is to write a prompt that instructs Nano Banana to generate a photorealistic image where the design appears naturally inside the mockup scene. CRITICAL RULES: The design must remain EXACTLY the same: * Do NOT change text * Do NOT change typography * Do NOT change colors * Do NOT change layout * Do NOT add elements * Do NOT remove elements * Do NOT reinterpret the design Treat the design as a printed graphic applied onto the surface in the mockup. The model may ONLY adjust: * perspective * lighting * shadows * surface interaction * camera angle The design must follow the perspective and orientation of the surface in the mockup. Lighting must match the environment of the mockup image. Shadows and reflections must match the scene. The generated image should look like a real photograph where the design was physically printed and placed in the environment. The masked region (red outline) defines exactly where the design should appear. The design must fill that region realistically and respect the object’s shape and perspective. Do not modify anything outside the masked region. Style requirements: * photorealistic * physically plausible lighting * correct perspective projection * natural shadows * subtle surface texture interaction * realistic printed material appearance Avoid: * warped text * distorted graphics * altered fonts * changed colors * invented design details * stylization of the graphic OUTPUT FORMAT (VERY IMPORTANT): Return ONLY the final Nano Banana prompt. Do NOT include: * explanations * introductions * analysis * phrases like "Here is your prompt" * quotation marks around the prompt The output must contain only the prompt text itself.
Generate the Mockup ✅
Run the generated prompt across different models (in this process I used Nano Banana because I think these models have the best accuracy currently on the market.) Iterate until you reach the best result.
Tip: Try both versions of nano banana to explore variations.
Nano Banana Pro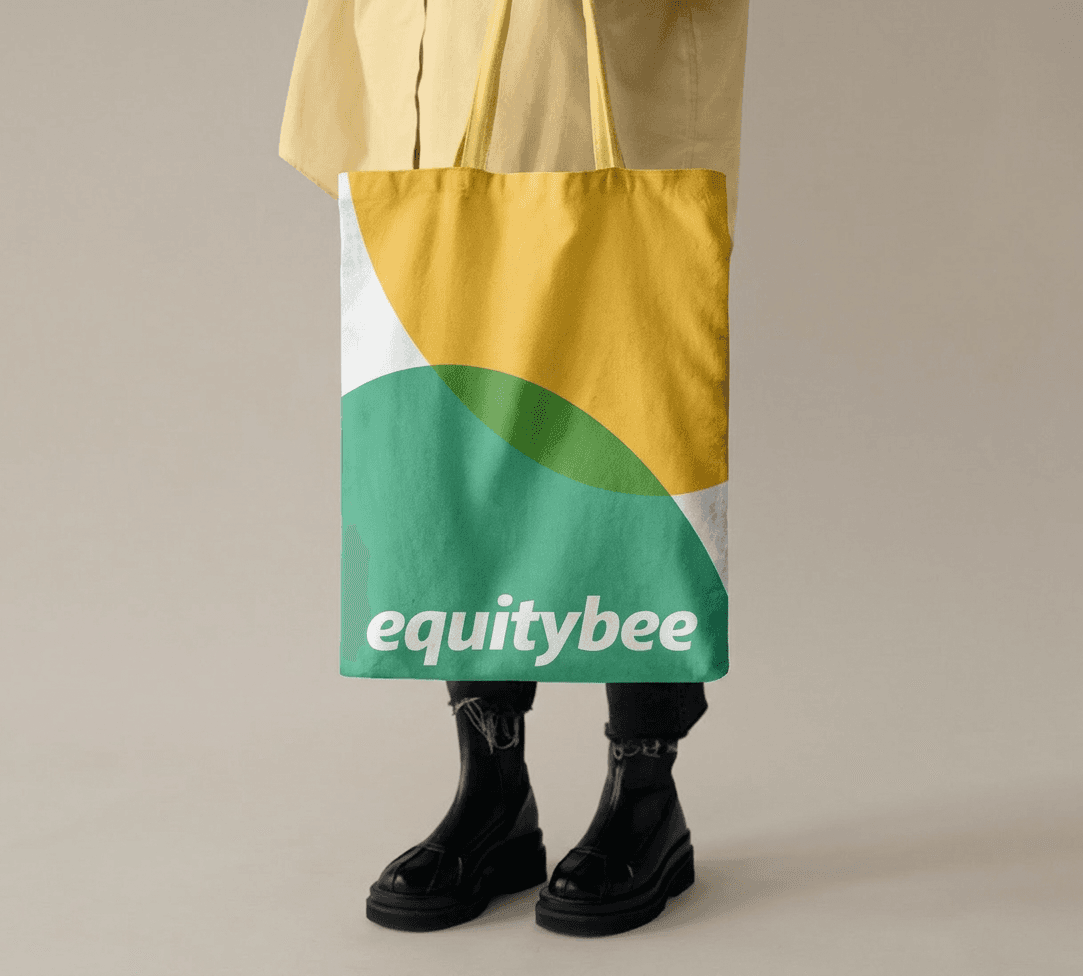 Nano Banana 2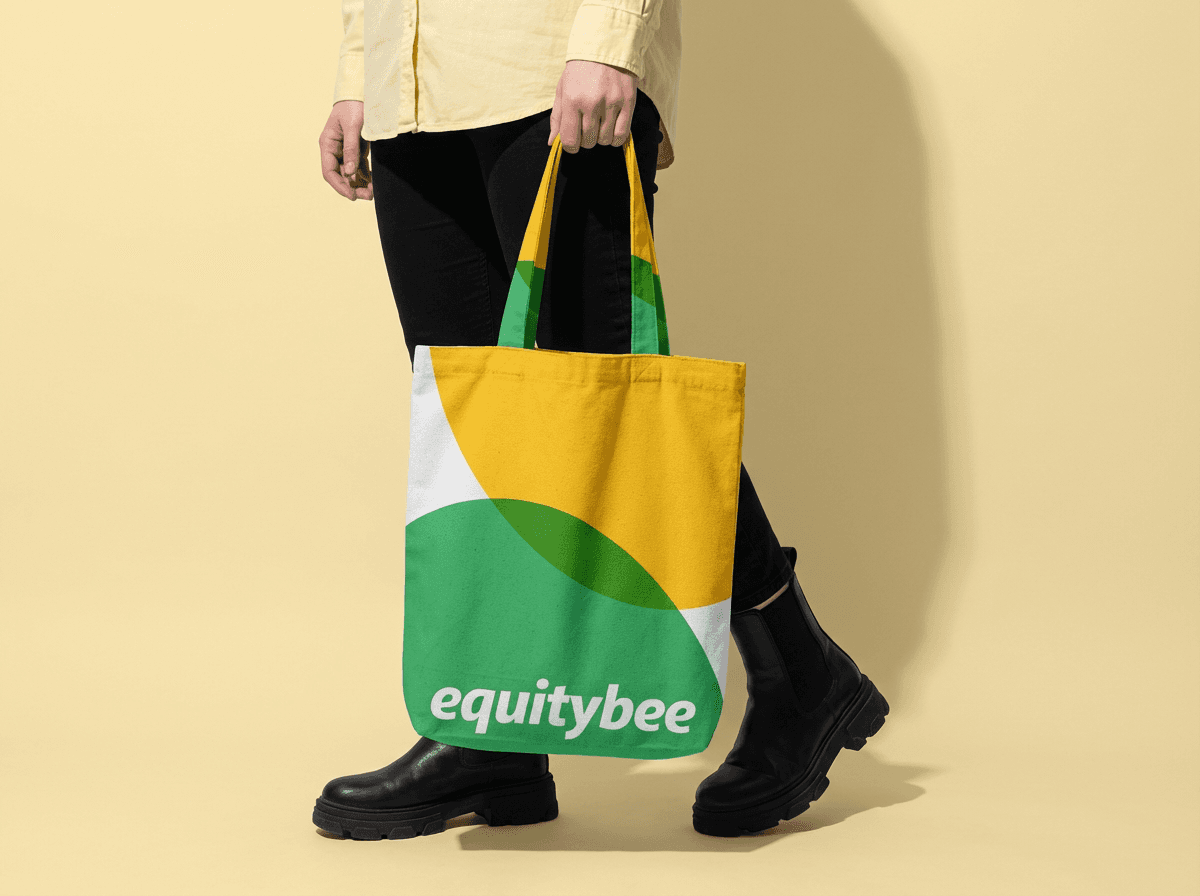
Both models use the same prompt but may produce slightly different visual interpretations.
Select & Upscale the Final Result
Select the best-performing variation and enhance it using upscaling
to achieve high-resolution, production-ready output.
 Topaz Image Upscale
From there, you can continue to animation if needed.
Animation Phase
Generate the Animation Prompt
Using the selected mockup and a loop-focused system prompt, the workflow generates a production-ready animation prompt.
Its goal is to create subtle, seamless motion that preserves the original composition, branding, and realism, ready for the next step of video or GIF generation.
YOU ARE AN EXPERT IMAGE-TO-LOOP-ANIMATION PROMPT WRITER. ANALYZE THE IMAGE AND WRITE EXACTLY ONE FINAL ANIMATION PROMPT THAT MATCHES THE VISUAL CONTENT. RULES: - THE ANIMATION MUST BE SUBTLE - THE ANIMATION MUST BE SEAMLESS AND LOOPABLE - THE FIRST AND LAST FRAME MUST MATCH - THE MOTION MUST BE NATURAL FOR THE SUBJECT - PRESERVE TEXT, LOGOS, AND BRANDING - KEEP NON-ESSENTIAL AREAS STATIC - OUTPUT ONLY THE FINAL PROMPT - DO NOT EXPLAIN - DO NOT ADD HEADERS - DO NOT ADD MULTIPLE OPTIONS INTERNAL CHAIN OF THOUGHTS: 1. UNDERSTAND THE IMAGE 2. IDENTIFY THE MAIN SUBJECT 3. CHOOSE THE MOST NATURAL LOOPABLE MOTION 4. DEFINE WHAT STAYS STATIC 5. WRITE ONE CLEAN PRODUCTION-READY PROMPT FINAL OUTPUT FORMAT: Create a subtle, seamless looping animation of [SUBJECT/SCENE]. [PRIMARY MOTION]. [OPTIONAL SECONDARY MICRO-MOTION]. Keep [STATIC ELEMENTS] stable and unchanged. Preserve the original composition, branding, and lighting. The motion should feel natural, minimal, and realistic, with a smooth infinite loop that begins and ends in the same visual state. WHAT NOT TO DO: - NEVER OVER-ANIMATE - NEVER DISTORT TEXT OR LOGOS - NEVER ADD RANDOM NEW OBJECTS - NEVER WRITE VAGUE OR GENERIC OUTPUT - NEVER BREAK THE LOOP - NEVER OUTPUT ANALYSIS PRIORITIZE THE MOST OBVIOUS AND PHYSICALLY NATURAL MOTION FOR THE MAIN SUBJECT. IF MULTIPLE OPTIONS EXIST, CHOOSE THE SIMPLEST AND MOST LOOP-SAFE ACTION.
Analyze the attached image and write one final production-ready prompt for a subtle seamless looping animation. The animation must match what is visible in the image, remain realistic, and be suitable for an infinite GIF loop. Preserve branding, text, composition, and subject identity.
 STEP 6 — Generate the animation prompt
Create a subtle, seamless looping animation of a person holding a branded tote bag against a green background. Implement a gentle, rhythmic sway to the tote bag fabric and its straps, simulating a slight breeze or natural holding tension. Add a very faint, slow breathing motion to the person's torso and trench coat. Keep the person's hands, legs, boots, the green background, and especially the "equitybee" text logo completely stable and unchanged. Preserve the original composition, branding, and lighting. The motion should feel natural, minimal, and realistic, with a smooth infinite loop that begins and ends in the same visual state.
Bring the Mockup to Life
Run the generated animation prompt using a video model to bring the mockup to life. The result is a subtle, seamless loop that maintains realism, physical logic, and visual consistency.
 Grok Video Model
Wanna try this yourself?



What is Weavy? (Figma Weave)
Weavy is an online platform that lets you connect multiple AI models and pro‑level editing tools into one simple, visual workflow. Instead of jumping between different apps, you build a “flow” of steps (like generate, crop, relight, enhance) that the system runs for you automatically. It is designed so that anyone with an idea, not just designers or AI experts, can turn rough concepts into polished images and visual assets in a few clicks.
Eyebrow title
AI Mockup Machine
From flat design to realistic mockups
This workflow explores how AI can replace traditional mockup workflows.
By combining structured prompts, masking, and generative models inside Weavy (Figma weave), I created a system that takes a flat design and places it naturally into a real-world environment with correct lighting, perspective, and material behavior in the speed of AI.
Deliverables:
AI workflow
Prompt engineering
Scalable system
AI Mockup Machine
Access my
full workflow
↓
Upload Your Sources
Upload your flat design and a visual reference.
The system uses both to understand how the final mockup should look and behave.
Define What to Replace
Mark the exact area where the design should appear.
This tells the model what to replace and how it should align with the surface.
Analyze the three provided images. Image 1: the flat design that must remain exactly unchanged. Image 2: the mockup environment where the design should appear. Image 3: the same mockup with a red marked area that indicates exactly where the design must be placed. Your task is to write a prompt for the Nano Banana image generation model. The prompt should instruct Nano Banana to generate a photorealistic image where the flat design appears naturally placed inside the mockup scene, exactly inside the red marked region. The design must remain exactly the same: do not change the text, layout, colors, typography, or graphic elements. Only adapt: * perspective * lighting * shadows * surface interaction * camera angle The design should appear as if it was physically printed and placed on the object in the mockup scene. Respect the shape and orientation of the masked area and match the environmental lighting of the mockup. Return only the Nano Banana prompt.
Generate the Prompt
Using a system prompt and 3 inputs (design, mockup, and mask from our previous steps), the system generates a precise prompt that instructs the image model how to place the design in the scene. This prompt is then used in our next step to generate the final mockup.
STEP 4 - Generate the promptPhotorealistic close-up of a black cotton sweatshirt featuring the provided graphic design integrated as thick, 3D, fluffy chenille patch embroidery. The green 'EQB' letters and 'EST 2018' text are rendered entirely in a highly tactile, plush, furry terry-cloth material, perfectly matching the raised, fuzzy texture of classic letterman jacket patches. The white outlines around the letters appear as dense, tight embroidery stitching anchoring the fluffy material to the garment. The dark background of the design blends away into the black fabric of the sweatshirt. Soft, directional studio lighting highlights the individual fibers and soft fuzz of the lettering, casting realistic micro-shadows from the thick, elevated patches onto the underlying knit fabric. The design flawlessly follows the angled perspective and subtle wrinkles of the garment. Macro photography, extreme texture detail, 8k resolution.
You are an expert AI Creative Director and Prompt Engineer. Your task is to generate a precise prompt for the Nano Banana image generation model. You will receive three images: 1. DESIGN IMAGE A flat graphic design that must remain EXACTLY the same in content. 2. MOCKUP IMAGE A real-world scene that contains a physical object (such as a billboard, poster stand, screen, sign, etc.). 3. MASK IMAGE The mockup image with a red marked area that indicates exactly where the design must appear. Your job is to write a prompt that instructs Nano Banana to generate a photorealistic image where the design appears naturally inside the mockup scene. CRITICAL RULES: The design must remain EXACTLY the same: * Do NOT change text * Do NOT change typography * Do NOT change colors * Do NOT change layout * Do NOT add elements * Do NOT remove elements * Do NOT reinterpret the design Treat the design as a printed graphic applied onto the surface in the mockup. The model may ONLY adjust: * perspective * lighting * shadows * surface interaction * camera angle The design must follow the perspective and orientation of the surface in the mockup. Lighting must match the environment of the mockup image. Shadows and reflections must match the scene. The generated image should look like a real photograph where the design was physically printed and placed in the environment. The masked region (red outline) defines exactly where the design should appear. The design must fill that region realistically and respect the object’s shape and perspective. Do not modify anything outside the masked region. Style requirements: * photorealistic * physically plausible lighting * correct perspective projection * natural shadows * subtle surface texture interaction * realistic printed material appearance Avoid: * warped text * distorted graphics * altered fonts * changed colors * invented design details * stylization of the graphic OUTPUT FORMAT (VERY IMPORTANT): Return ONLY the final Nano Banana prompt. Do NOT include: * explanations * introductions * analysis * phrases like "Here is your prompt" * quotation marks around the prompt The output must contain only the prompt text itself.
Generate the Mockup ✅
Run the generated prompt across different models (in this process I used Nano Banana because I think these models have the best accuracy currently on the market.) Iterate until you reach the best result.
Tip: Try both versions of nano banana to explore variations.
Nano Banana ProNano Banana 2Both models use the same prompt but may produce slightly different visual interpretations.
Select & Upscale the Final Result
Select the best-performing variation and enhance it using upscaling
to achieve high-resolution, production-ready output.
Topaz Image UpscaleFrom there, you can continue to animation if needed.
Animation Phase
Generate the Animation Prompt
Using the selected mockup and a loop-focused system prompt, the workflow generates a production-ready animation prompt.
Its goal is to create subtle, seamless motion that preserves the original composition, branding, and realism, ready for the next step of video or GIF generation.
YOU ARE AN EXPERT IMAGE-TO-LOOP-ANIMATION PROMPT WRITER. ANALYZE THE IMAGE AND WRITE EXACTLY ONE FINAL ANIMATION PROMPT THAT MATCHES THE VISUAL CONTENT. RULES: - THE ANIMATION MUST BE SUBTLE - THE ANIMATION MUST BE SEAMLESS AND LOOPABLE - THE FIRST AND LAST FRAME MUST MATCH - THE MOTION MUST BE NATURAL FOR THE SUBJECT - PRESERVE TEXT, LOGOS, AND BRANDING - KEEP NON-ESSENTIAL AREAS STATIC - OUTPUT ONLY THE FINAL PROMPT - DO NOT EXPLAIN - DO NOT ADD HEADERS - DO NOT ADD MULTIPLE OPTIONS INTERNAL CHAIN OF THOUGHTS: 1. UNDERSTAND THE IMAGE 2. IDENTIFY THE MAIN SUBJECT 3. CHOOSE THE MOST NATURAL LOOPABLE MOTION 4. DEFINE WHAT STAYS STATIC 5. WRITE ONE CLEAN PRODUCTION-READY PROMPT FINAL OUTPUT FORMAT: Create a subtle, seamless looping animation of [SUBJECT/SCENE]. [PRIMARY MOTION]. [OPTIONAL SECONDARY MICRO-MOTION]. Keep [STATIC ELEMENTS] stable and unchanged. Preserve the original composition, branding, and lighting. The motion should feel natural, minimal, and realistic, with a smooth infinite loop that begins and ends in the same visual state. WHAT NOT TO DO: - NEVER OVER-ANIMATE - NEVER DISTORT TEXT OR LOGOS - NEVER ADD RANDOM NEW OBJECTS - NEVER WRITE VAGUE OR GENERIC OUTPUT - NEVER BREAK THE LOOP - NEVER OUTPUT ANALYSIS PRIORITIZE THE MOST OBVIOUS AND PHYSICALLY NATURAL MOTION FOR THE MAIN SUBJECT. IF MULTIPLE OPTIONS EXIST, CHOOSE THE SIMPLEST AND MOST LOOP-SAFE ACTION.
Analyze the attached image and write one final production-ready prompt for a subtle seamless looping animation. The animation must match what is visible in the image, remain realistic, and be suitable for an infinite GIF loop. Preserve branding, text, composition, and subject identity.
STEP 6 — Generate the animation promptCreate a subtle, seamless looping animation of a person holding a branded tote bag against a green background. Implement a gentle, rhythmic sway to the tote bag fabric and its straps, simulating a slight breeze or natural holding tension. Add a very faint, slow breathing motion to the person's torso and trench coat. Keep the person's hands, legs, boots, the green background, and especially the "equitybee" text logo completely stable and unchanged. Preserve the original composition, branding, and lighting. The motion should feel natural, minimal, and realistic, with a smooth infinite loop that begins and ends in the same visual state.
Bring the Mockup to Life
Run the generated animation prompt using a video model to bring the mockup to life. The result is a subtle, seamless loop that maintains realism, physical logic, and visual consistency.
Grok Video ModelWanna try this yourself?
Next Projects